Sunday, February 3, 2013

WPlus9 January/February 2013 Release Previews - Day 3


Hello there and welcome back! It's Day 3 of the WPlus9 January/February 2013 Release Previews. We have one more stamp set and coordinating die to introduce today before the big reveal tomorrow. Our feature stamp set today is Written On Ribbon and it's coordinating die. 

I made a technique card for today's project. I recently signed up for an older class on Online Card Classes and was watching a video from Jennifer McGuire. She loves to use this technique on her cards a lot and I wanted to try it out.

I heat embossed some doily images from Lacey Layers on a vintage cream cardstock. Then I used Distress Ink Peacock Feathers to ink the card. I wiped off the excess ink with a paper towel once I was done.

I continued on with the embossed theme by embossing my favorite image from Chantilly Trim onto vellum and die cut it with the Scallop die. I adhered it onto my card and covered the top edge with a chevron ribbon.


 Trying very hard to keep it simple, I die cut this ribbon and stamped its coordinating image onto it. Then I picked out a sentiment and filled in the ribbon. 


Ok. That's it for me today! Come back tomorrow for the FULL REVEAL! I'll have another project for you tomorrow! 

Would you like a chance to win this set and die? All you have to do is leave a comment on the WPlus9 Blog! Make sure to drop by the other DT girls' blogs to leave them some love!
Thanks for stopping by today! See you again tomorrow! :)


Saturday, February 2, 2013

WPlus9 January/February 2013 Release Previews - Day 2


Welcome back! It's time for day 2 of the WPlus9 January/February 2013 Release Previews. I hope you enjoyed all of the DT projects yesterday. Today we're introducing 2 new stamp sets as well as a coordinating die set. Today's featured sets: Lacey Layers, Lacey Layers Dies, and Embroidered Bouquet


I have two cards for you today. Let's start with the first one. I used Lacey Layers and Lacey Layers Dies. Lacey Layers is a doily "building" set. It's my favorite set for this release!  


I made a patterned paper with different colored doilies on it for my background panel. Then I adhered a piece of patterned paper on the bottom of the card. I also stamped an image from Chantilly Trim and die cut it with the Scallop Die and sewed it on.


I used the Lacey Layers die, stamped it in white and cut it in two. I adhered it behind the label from Very Vintage Florals. Then I stamped a sentiment from Quite Like You. I also added a pink ribbon to soften the look a little. 

Let's get to my second card. For this one, I used Embroidered Bouquet. I stamped the bunch of flowers in the center of my card. Then I stamped the smaller flowers in different colors and layered them on top of the bouquet I originally stamped. I also colored in some of the leaves and much smaller flowers with Copic markers.


I adhered a strip of washi tape to separate the stamped portion of my card and patterned paper I adhered on the bottom. Then I die cut and stamped these doily images from Lacey Layers and made a side border with them. I sewed the doilies on to add a bit more dimension to the card.


I tied some baker's twine around the card to finish it off. Here's a close up of the bouquet and the small flowers I layered on it.

That's it for me today! Make sure you head on over to the WPlus9 Blog for a chance to win these sets! And visit the other DT ladies for more inspiration! :) Thanks for stopping by today! Come back tomorrow for more! 


Friday, February 1, 2013

WPlus9 January/February 2013 Release Previews - Day 1


Hi there! Welcome! Welcome! The wait is finally over! It's time for WPlus9 January/February 2013 Release Previews!!! Welcome to Day 1 where we're introducing Very Vintage Florals, Very Vintage Florals Die, Chantilly Trim and Scallop Die.


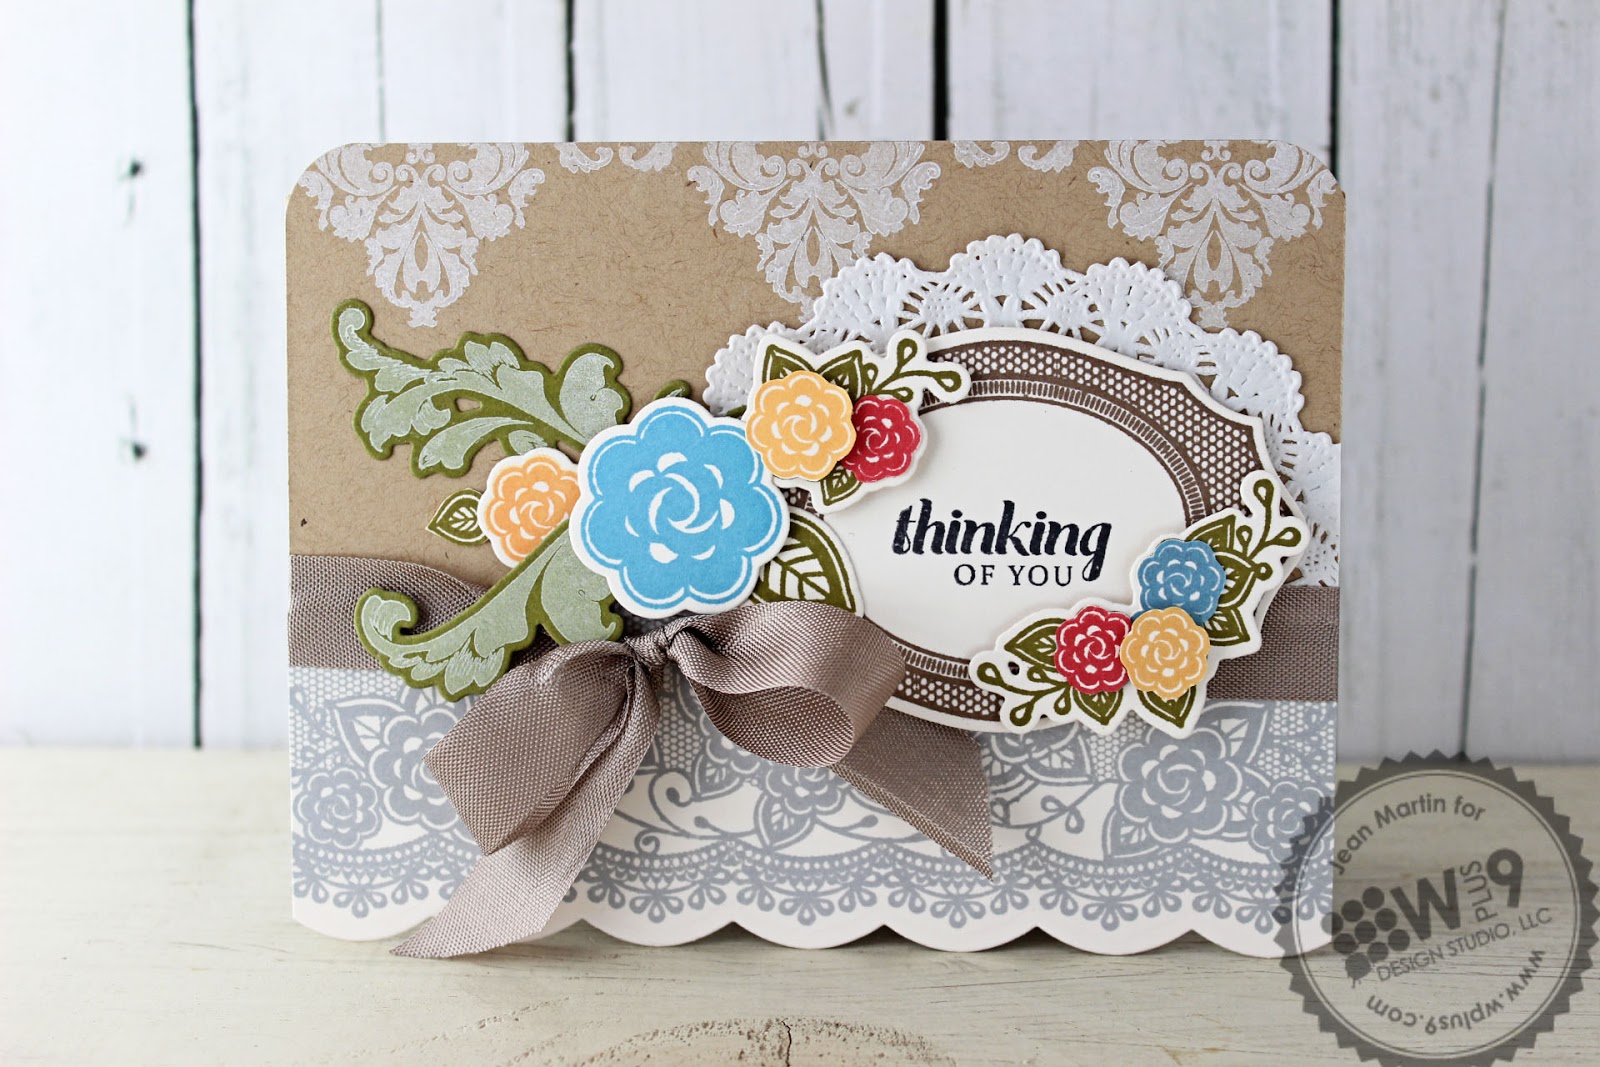
Let's get to it! I combined all stamp sets and dies to make my card for today. I absolutely LOVE it! I stamped this gorgeous lace border from Chantilly Trim onto white cardstock. Then I used the Scallop Die to trim the bottom. Doesn't it look like a dainty skirt?! 

WPlus9 will also be carrying a fantastic White Pigment Ink. I was absolutely delighted by this pigment ink! I could have kissed Dawn for it! You know how annoying it can be when the foam on your pigment ink is too soft and makes your acrylic block messy?! Well this pigment ink won't do that! The pad is firm and inks like pigment/chalk ink!!! Just look at the Damask Delight image that I stamped on the top of my kraft card base. The image is crisp and very white! I just love it!!!! I have been looking for a white pigment pink for such a long time. This is it! :)

 I stamped images from Very Vintage Florals. First the label and sentiment. Then I surrounded it with flowers. 

 I adhered it over a gray ribbon. I also added some flourishes from the Damask Delight set on the side. See how great the white pigment ink is?!?!?! Love. Love. Love!!! :) 

I hope you enjoyed that! I really loved making this for you! If you're all done here, head on over to the other WPlus9 DT girls! They have more in store for you! Leave them some love! Come back tomorrow for more! Thanks for stopping by today! :)

ps. We have a wonderful guest designer joining us this month. Please welcome my good friend Christina MacLaren! She does AMAZING things with WPlus9 stamps!!!! Make sure to visit her and leave her some love!!!

Monday, January 21, 2013

The Craft's Meow January 2013 Release Blog Hop


You made it! Welcome to The Craft's Meow January 2013 Release Blog Hop! How did you like the January Release Previews? I hope you're super excited about the new stamp sets! Before things go back to normal, please join us for the Blog Hop! 

The Craft's Meow

If you're coming from Ivana's blog then you're right where you're supposed to be! If not, head on over to The Craft's Meow Store Blog and start from there!

For today's card I used Happy as a Lark and Many Thanks. I don't think I'll ever get over my love for woodgrain. lol. I LOVE the woodgrain stamp in Happy as a Lark. I used it as my background for this card. I made a Thank You card for a little girl's cowgirl party! 


I also used Giddy Up to continue my Cowgirl Party theme. I just love the damask imprint on the horse's back. Beautiful! :)


The die cut behind the horse is supposed to be a snowflake. But I combined to together and hopefully it doesn't look too much of a snowflake anymore. I wanted it to be a star, but with more points! :) I needed something to highlight the center piece.

 I hope you enjoyed that! Would you like a chance to win ALL 5 January Release stamp sets?! All you have to do is leave a comment on each blog hop participant's blog! The deadline to comment is 9:00pm PDT, Wednesday, Jan 23rd. Also, TCM is giving Lark Additions as a gift for purchases $50 and above. 

If you're all done here, please head on over to Jen's blog for more! Thanks for stopping by today! I'll see you all again soon! :)


Sunday, January 20, 2013

Simon Says "Use Washi Tape" and Play Date Cafe 165


Hi there! I had some time this morning to get a little inky on my craft table. I played a little tennis yesterday after 4 years of not playing. And I threw my back! Oh my goodness!!! I had never felt so old. EVER. I didn't know if I was going to laugh at myself or cry because it hurt a lot. But because of it I'm stuck at home today. (Hence the time to make a card.) Hopefully it goes away soon.

Anyway, there were two challenges that I wanted to try out since I saw them. Play Date Cafe - A Study In Beauty has a wonderful color combination this week! I HAD to give it a try. Simon Says Stamp also has one, it's a "Use Washi Tape" challenge. I LOVE washi tape. Even if at times I don't know what to do with them. lol. I just love to look at them! Haha!

Simon Says Stamp   

Here's my take on these two challenges. When I saw the color combination on Play Date Cafe this came to mind. I had seen something similar in Pinterest and really wanted to try it out. I used WPlus9 Folk Art Florals to make the decorative flower element on my card. I had to add the chartreuse leaves though otherwise the idea wouldn't work. 


I masked some of the flowers using Eclipse masking tape and started stamping away. As I got to the ends of the "vine" I stopped masking and just let the colors blend in one on top of the other. I think it looks ok though. 


The sentiment is from WPlus9 Cupid's Arrow. I kept it black to even out all the colors I had used with the vines. I also added washi tape on the top left and lower right portions of the card. I thought it looked like something was missing there. The washi tapes filled it in beautifully. I actually made a FLAT card!!!! Can you believe it?! Yay! :) lol.

 My back feels terrible, but I'm glad I had some time to join in these challenges. It's been a long time since I just made a card for fun and not a DT assignment. Well, that's it for me. I need to rest my back now. Thanks for stopping by! 


The Craft's Meow January 2013 Release Previews - Day 4


The weekend goes so fast. I wish it would last a little longer. Before it ends The Craft's Meow has one more set to introduce to you. Today, we're featuring Many Thanks by Kaitlyn Ord.

The Craft's Meow

Many Thanks is a sentiment set that I think you're going to be using a lot. With so many different ways to say Thank You, this set is a keeper! :)


I kept things simple and combined three different patterned papers. Then I heat embossed a floral image from Flower Garden.


I stamped my sentiment on the side and added some embellishments. I placed some buttons side by side to separate the lower portion of the card. And I sewed a ribbon up top to do the same. Finally, I added some chipboard leaves to balance things off.

Would you like to win this set? All you have to do is go to The Craft's Meow Store Blog and leave a comment! :) Come back tomorrow for the Blog Hop!!! Thanks for stopping by today. I see you again tomorrow!


Saturday, January 19, 2013

The Craft's Meow January 2013 Release Previews - Day 3


Yay! It's finally the weekend. It could not come any sooner. I have more crafty time on the weekends so I'm really glad to have some time to play. I still have some DT projects that I have to finish but hopefully I'll have time just to join in on some challenges. 

Before I get to any of that, welcome back! Today is Day 3 of The Craft's Meow January 2013 Release Previews. We're introducing two sets today, Happy as a Lark and Lark Additions from Karen Baker. Lark Additions will be given out as a free gift for purchases of $50 and above.

The Craft's Meow

I made two coordinating cards for the two sets we're introducing today. First up is my Wishing You Happiness card. I stamped the flourish image from Beautiful Hymns onto the card. Then I adhered a strip of patterned paper from My Mind's Eye on the left side of the card. 


I also stamped 6 hearts in two shades of pink and die cut it into two sizes. I put the smaller one on top of the larger one and sewed it on.

 Then lastly, I stamped my sentiment on the side and rounded the edges of one side of my card. 


 I made another card and wanted it to coordinated with the first. So I used similar color tones and patterned papers.

 I adhered a big panel of patterned paper onto my card. Then I stamped the wood grain background, cut it and rounded the edges. Then I stamped the bird image and hand cut it. I adhered it on the woodgrain panel and stamped a sentiment on the bottom.

 I finished off the simple card by adding some twine and lace. I also added strips of washi tape on the side and adhered a flower over them. 


That's it for me! I'll be back with more TCM goodness tomorrow! Don't forget to check out what the other DT ladies made for you! And you'll have a chance to win this set on The Craft's Meow Store Blog. All you have to do is leave a comment! 

Thanks for stopping by today! I'll see you all again tomorrow! :)


LinkWithin

Related Posts with Thumbnails