Hello there! The WPlus9 October Release went well! I hope you liked the sets and dies we previewed last week. Are you playing with your newly acquired stamp sets already? Well, here's an idea...how about making a card gift set with a coordinating DIY gift box? :)
If you're making several of these, it's a good idea to plan ahead for something simple. Because anything too elaborate and very layered would be very hard to make in multiples. For my card set, I used my favorite set from the August/September Release, Fanciful Feathers.
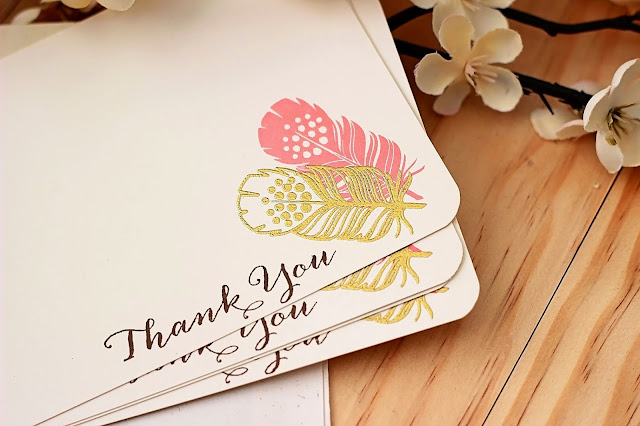
I made flat cards and stamped the filled in feather image in Hero Arts Fresh Peach. Then I heat embossed the outlined image of the feather in gold embossing powder, slightly over the first image. Then I stamped the sentiment beside it. To finish it off, I rounded the edges with a corner rounder punch.
As for add-ons, it's a great idea to make feather stickers to seal the envelopes. I just used the coordinating dies for the stamps, then stamped and/or heat embossed the feathers on the die cuts. Then I ran them through my Xyron sticker maker and there you go! Matching stickers! :) If you'll notice, I also lined the inside of the card. I think that adds such great detail to the stationery set. For this, I used the A2 Envelope Liner Die to make my brown liners. I used a darker color so that the lighter cards would pop. :)
I also made a matching stationery box for my little card set. Here's the little tutorial on how to make it. It's absolutely easy! I'm using brightly colored cardstock so that you can see it better.
1. Start with a 10 x 6 cardstock. Round the edges for safety.
2. Score at 4.75" and 5.25". Then fold at the score lines.
3. Then cut another piece of cardstock this time at 5.5" x 6.75".
4. Score 0.5" from each of the four edges.
5. Then cut 0.5" on each lengthwise side to make flaps.
6. Fold at the scored portions of the cardstock.
7. Assemble your little box by using strong adhesive on the flaps you made and adhering it to the side/flaps of the tray.
8. Finally, adhere it to the bottom of the cover/folder that you initially made. Remember to use a very good adhesive so that it doesn't fall apart. You can keep it plain and simple. Or you can add a design on the cover like I did with mine.
I added a little designed cover so that the person I'm giving this set to has an idea of what's in store for her. :)
I tied my envelopes and cards together with twine and inserted the stickers underneath. This card box can hold upto 5 cards and envelopes. If you want to make something to hold more cards, just increase the width of your scored edges.
And there you go! An easy card set with a matching gift box and coordinating stickers. I hope you learned something new today. Thanks for stopping by! I'll see you again soon!


Such a lovely set! I like those colors too. That peach looks so rich with the gold. Very pretty!
ReplyDeleteThis is a really cute project...every detail so well thought out. I can't imagine anyone not loving this!
ReplyDeleteGorgeous set of cards, what a fantastic gift, love the little stickers you created, an extra special touch!
ReplyDeletelove!!!!
ReplyDeleteThis is super! I love it! I often give card sets as gifts, but the box puts it over the top! I will be trying this for sure! Thanks Jean ;)
ReplyDeleteI love these boxes!! Thanks for sharing :)
ReplyDeleteWhat a lovely gift set! Love...love..this Jean! I'm gonna have to give the gift box a try one of these days :)
ReplyDeleteThis is fabulous!
ReplyDeleteSo beautiful! Thanks for the instructions on how to make the box!
ReplyDeleteI love this set! Thank you so much for sharing how you made such a beautiful gift. I might have to buy that enve liner die....
ReplyDeleteLove this set! Just fabulous!
ReplyDeleteOh my gosh ! I love this gift set you made ...simply gorgeous! Thank you so much for sharing!
ReplyDeleteThis is gorgeous, Jean! I love the idea of the seals and thanks for the box tutorial!
ReplyDeletegorgeous...love this wonderful idea for a gift.
ReplyDeleteVery nice
ReplyDelete