Saturday, March 23, 2013

Craft Room Tour!

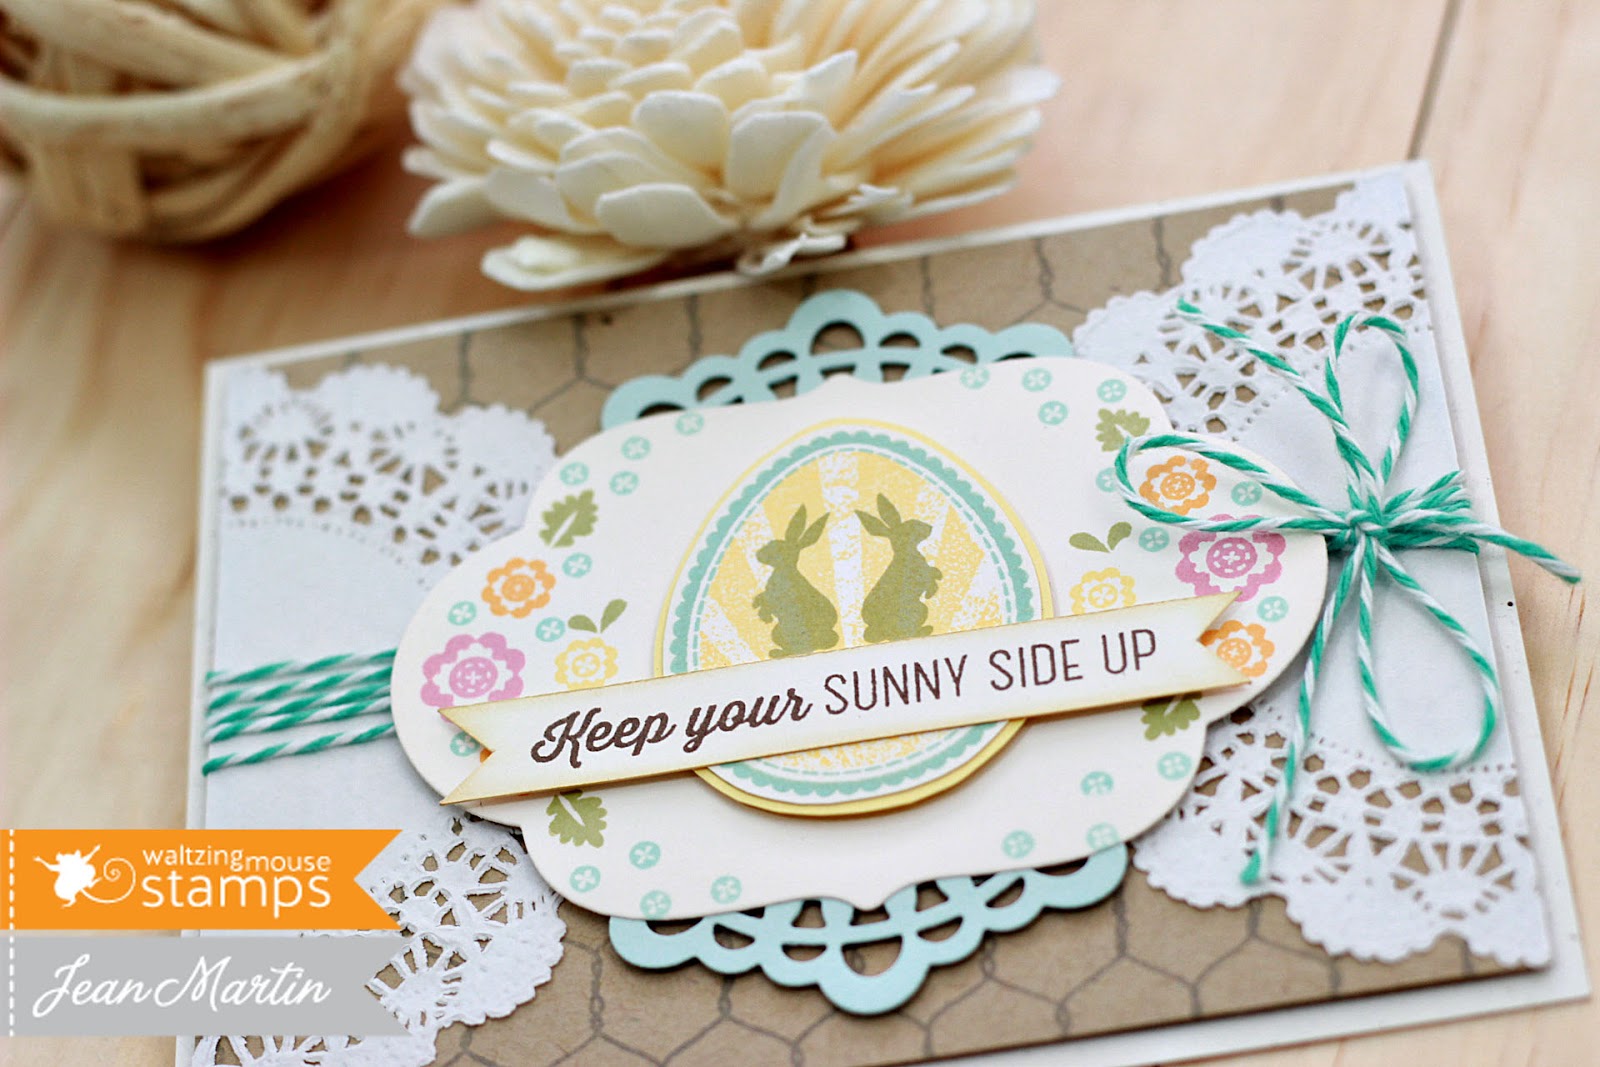
Happy Saturday! I'm back, and as promised, I have a little post today about my craft space.   It's nothing special I'm afraid. Just a little corner on the second bedroom of our apartment which shares the space with our home office. But I've tried to make good use of what little space I have. This post is heavy with photos...if you're not up for it turn back now! lol. So here we go...


This is how simple things are. No elaborate color scheme. No matching baskets or drawers. Just stuff from Ikea and Target that will hold and organize my craft supplies.
Oh and that hot mess under the table...cords!!! For my sewing machine, Cameo, and extension cord to charge my phone and tablet/laptop. I'm usually Skyping with my sisters while working on my projects so my tablet is always on my desk. I also use it to go through Pinterest and look for inspiration. 


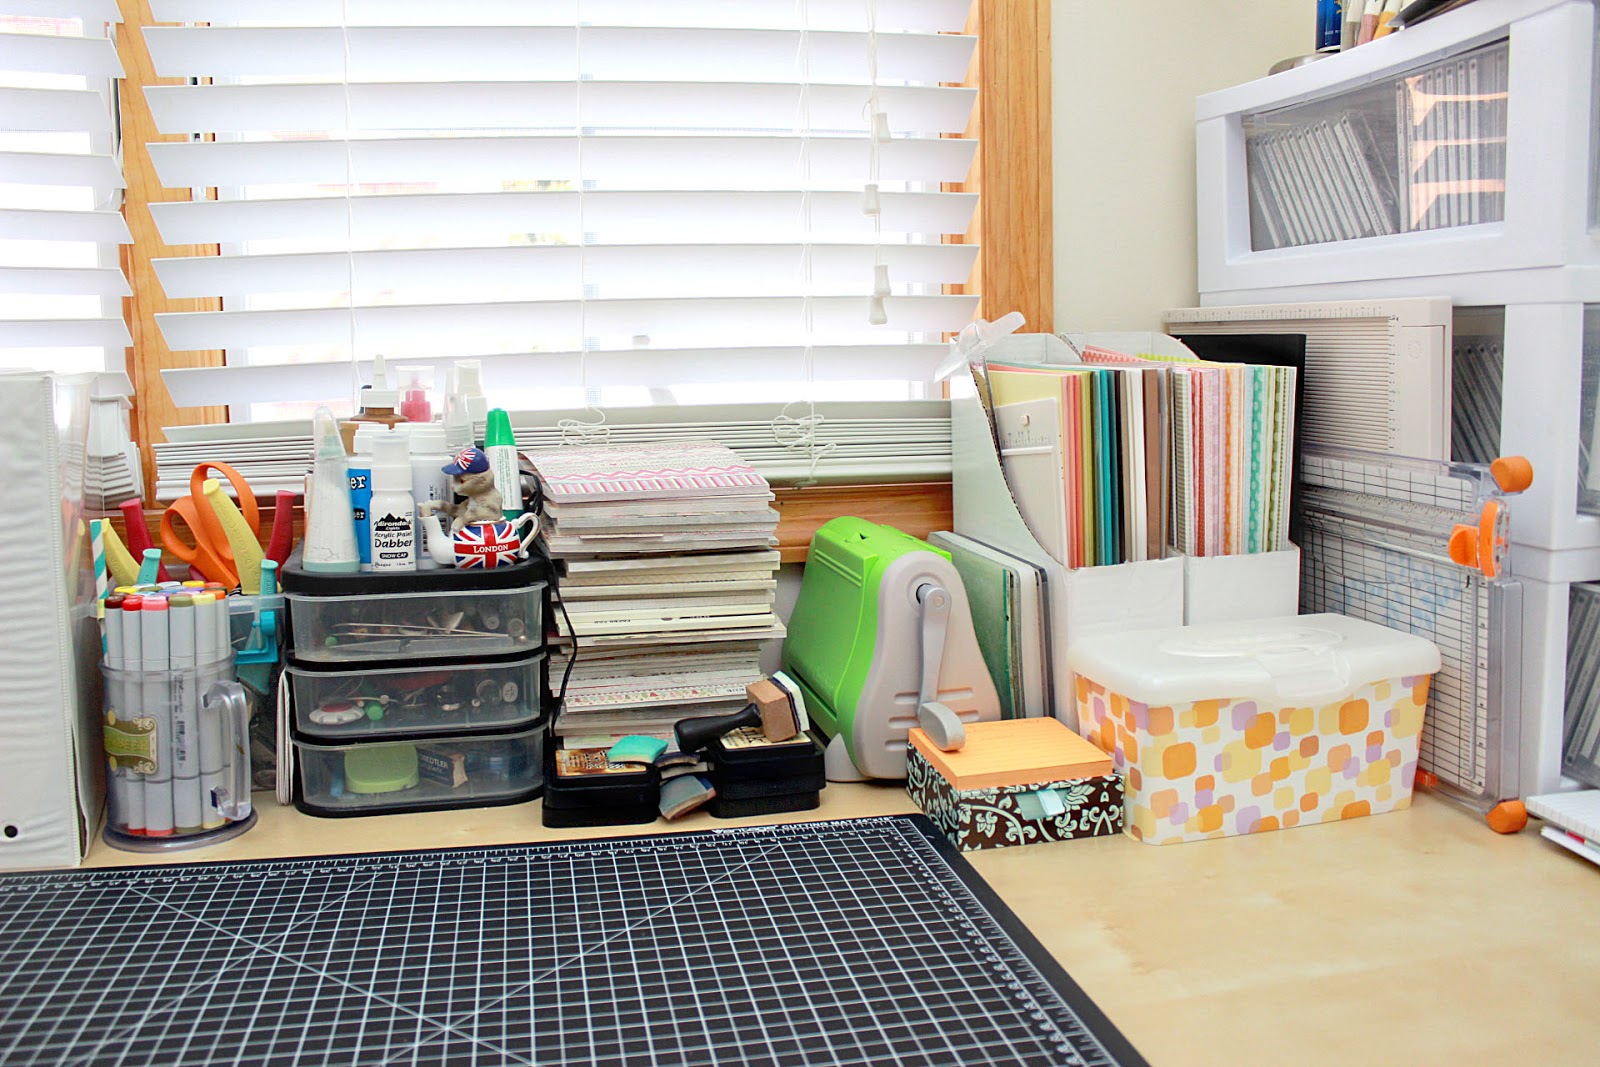
My desk usually looks like this. I don't like to work with clutter on the work surface because I find that I can't think creatively. So when I work on more than 1 project, I usually clean up before I start on the next project. I like my most used items right in front of me. So my PTI cardstocks and pattered papers are right here for easy each. I use Ikea magazine holders to keep them organized. I always reach for my Cuttlebug so it's right there too. That stack of patterned papers are all My Mind's Eye 6x6 pads. I only have a small collection of Copic markers. I picked out the common colors that I use and that's it! 


This is how I store my PTI stamps. These shoe drawers from Walmart are amazing! They fit the cd cases perfectly. And since they're see through, I can easily find what I'm looking for on the side where the labels show through. Oh and that little color chart beside it...I had to make that when I first bought my Hero Arts Shadow Inks. I wasn't familiar with the colors yet and needed a reference to look at while I worked.


To my left is another shorter stack of the shoe drawers from Walmart. On the lower one I have my Spellbinder dies in cd cases, my stack of buttons, adhesives and baker's twine. Right beside the shoe drawers is a stack of Sterilite drawers and above them I have my little sewing machine and all my acrylic blocks arranged in a tray. They are placed in such a way that I can find grab the size that I need quickly without digging through a basket/box.


Those 3 ring binders hold my dies. They're attached with magnetic tape onto thick comic book cardboard. 


For now, my other PTI stamp sets are held in a basket from the container store. How do you guys store these? Do you still put them in CD cases? 


To my left, is the stack of Sterilite drawers that contain embellishments, 12 x 12 patterned papers, and punches. The book case holds more Sterilite drawers containing embellishments, magazines as well as cardstock that I have no space for on my desk.

 This drawer under my desk to the right is from Ikea. It holds my other brands of stamp set. They're also within reach because I grab them so often. So far I have two drawers for each brand. They're almost full so I have to make another trip to Ikea to get another one. They store a LOT of stamp sets though. I love it! 

 To my right is another item from Ikea. Above it I have my inks, Cameo, light box to name a few. That filing system is how I keep my scraps organized. They are arranged according to color. And each hanging folder holds two more folders within it, one for patterned paper and the other for solid colors. That little box with the CD envelopes in it...that's where I keep extra die cuts that I made previously. They're really great and saves me a lot of die cutting time. And if you're wondering why I have a cutting board there...lol...I use it for my pictures. The white boards as well.


Here's a peak inside that small Ikea Cabinet. Other things that I can't store in my drawers are stuffed in here. lol. :) And now to answer the request that some of you have recently asked me...how do I take my photos?

 This is it. No big set up going on. Just a wood plank, white boards and props. Most of my props are stuff I found around the apartment. The rest are cheap bits and bobs from Michael's. I just move the white boards around depending on the light. And I have three extra bright white lights that I use at the same time as the natural light from my window.  

I hope you found this post useful and if you have any questions about my photo set up just leave me a comment and I will make sure to get back to you. Thanks for stopping by today! :)


Thursday, March 21, 2013

A Thank You Stationery Set for WPlus9 Design Studio

***This is my second post for today. Please scroll down for my CASE Study Challenge 133 post.***

Hello, I have a special post for you all today. Dawn from WPlus9 recently asked me if I could make a few extra completed projects for the WPlus9 Design Studio. And if you've been following me for some time now, you would have noticed that I make mostly card projects. But this time around, I'm challenging myself to make other projects aside from cards. I already have a few ideas up my sleeves and I'm so excited to share them with you. 


So since this is just my first special project, I started with something that was within my comfort zone....a Thank You stationery set! I know, not exactly a big change! lol! But my sister has been asking me for like forever to make her a stationery set. She’s a mom of three rowdy boys, and she sends a lot of thank you notes to their teachers in school. (Maybe even some I’m Sorry notes too. ) So I thought that a Thank You set would be most useful for her right now.  I’m also planning on making a personalized set with her name on it for other notes she might want to send. 


I used Folk Art Florals, Very Vintage Florals, Filigreed Frames, Spring Tags and Mother’s Day Bouquet.  I just took flowers and leaves from each and started stamping around and underneath the sentiment.  My sister loves flowers so this is just perfect for her. I rounded the corners with my Corner Chomper so that if she ever leaves it on her desk and the kids go through it, there won’t be any sharp edges.


Since this is a stationery set, I couldn’t just make the note cards alone. I also cut out 
envelope liners and used the same flowers to stamp them with.  I think that envelopes
without liners look incomplete.  This way, it coordinates really well, and there’s another
beautiful surprise when the recipient opens the letter.  I also made envelope seals.
These are a lovely added bonus to the set!  I just punched out a few circles and then
stamped the floral images on them.  Then I ran them through my Xyron sticker maker.
Viola! Easy peasy! 


I added a few colored pens with the set just because I LOVE pens.  You can make your
own Thank You stationery that looks just as beautiful as store bought ones.  And the
people who will receive your notes will love that it’s your very own hand stamped
cards.  I made 10 cards for this set.  If you don’t have a lot of time or patience to stamp
all these over and over for 10 cards, you can always choose a simpler design. 


As for packaging, I just tied the cards and envelopes with some colored jute.  I’m 
thinking of putting it all in a glassine bag.  Or maybe a nice gift box.  I promise to work
on that on my second stationery set!  If you’ve made your own stationery sets, I would
love to see what you have done! You can leave a link for your projects in the comments section of my blog. I'll make sure to visit and drop you a line. :) If you have any suggestions as to what you would like to see me create with WPlus9 supplies, I would love to hear about them!     

Thanks for stopping by today.  I hope you enjoyed
this project and that it inspires you to make your own!  Until next time...


Sunday, March 17, 2013

Waltzingmouse Stamps March Blog Party


Hello there! I hope you're joining me from the Watlzingmouse Stamps Blog Party. Every 17th of the month, Waltzingmouse Stamps plays host to a themed Blog Party. This week's theme is "LUCK". So pull out all your green inks, your four leaf clover stamps, and maybe even a little leprechaun? :) 


My card was inspired by this photo from Pinterest. It's a great place to look for inspiration specially when my mind is completely blank...which happens a lot. lol.


The "woodland" luck theme seemed perfect for the WMS March release A Good Egg. I thought...woodland...bunnies...makes sense. I had so much fun putting these cards together that I decided to make another one. 

I also used images from Folk Art Medallion to put this sweet little card together. I kept the design pretty simple. I didn't want to take away from the stamped images. They seemed to be doing pretty well on their own.


I hope this gave you a little bit of inspiration to join us over at the Waltzingmouse Stamps March Blog Party. If you're all done here, head on over there and check out what other crafty folks made! Thanks for stopping by today! :)


Friday, March 8, 2013

Waltzingmouse Stamps DT Blog Waltz

 You've reached the last installment of the Waltzingmouse Stamps March 2013 Release Previews! Welcome to the DT Blog Waltz! I hope we've given you enough inspiration and ideas for the new March release stamp sets. I was so blown away by my teammates projects! I would never have thought to do a lot of what they did if I had never seen their work! I myself love releases, and I hope you loved this one! :)

Since this is a blog hop, you should have come from Jen's blog, if not, you just might be lost! (lol) So hop on to the Waltzingmouse Stamps Blog to start from the beginning.

For the blog waltz, I combined an image from each stamp set being released this month. I just wanted to show you how well they work together. On my background panel, I stamped the Folk Art Medallion image and then softened it up by painting over it randomly. Then I tied this colored jute around the card. I found this at my local Michael's. I'm not sure what it's called but from the look and smell, it seemed to be jute. :)

I also stamped and colored in the Folk Art Label with my Copic markers. Then to finish the card off, I stamped in the bunnies and chicks using A Good Egg. I also stamped and cut the birdhouse and banner and adhered them with foam tape. Now if you're all done here, head on over to Karin's blog for more inspiration!

Would you like to win a stamp set from Waltzingmouse Stamps? :) Well, all you have to do is leave a message on EACH of the blog hop participants. You have until March 11th at 11:59 PM (GMT), 5:5 9AM Central (March 12), 3:59 AM Pacific and 6:59 AM Eastern. 

Good luck to you all! Thanks for stopping by today! :)


Thursday, March 7, 2013

Waltzingmouse Stamps March 2013 Release Previews - Day Three

***This is my second post for today. Please scroll down for CASE Study Challenge 131.***

You made it to the last day of the Waltzingmouse Stamps March 2013 Release Previews - Day Three! What do you think of the release so far? Isn't it amazing?! I had so much fun with my sets. We have one more to introduce today. THIS fabulous set is called Folk Art Medallion.

For my first card, I wanted to do a neutral and elegant card. I just knew I wanted to layer, layer and layer away! I heat embossed the first layer in white. The next layer was made of canvas, I stamped on it and die cut it circle. Then I frayed the edges for more texture. And lastly, I made a "floral" feature on top of it all. 


I added some bling all around the medallion and added jute twine around the card. I like that it's both elegant and rugged at the same time. Does that make sense? lol.


I have one last card to share with you today. You are going to be surprised with this one...I was! It's not my usual style...it was just something I was trying out. Please tell me what you think about it ok? :)


For this card, I dry embossed the background and inked it so that it would stand out against the white. I heat embossed the medallion in pink this time. Then I stamped the flowers in different colors.

The whole background and medallion reminded me of a forest scene. I have no idea why, but that's why I added the birch tree die cut. Although now that I'm looking at it, I should have raised the medallion a little higher.

I added the ribbon to soften it up and stamped the sentiment on a die cut strip to finish it off. I'm hoping this gets a good receiving. :)


That's all I have for you today! Come back tomorrow for the Blog Waltz! In the meantime, there's more inspiration to be found at the other DT girls' blogs. So head on over there! Thank you for stopping by today! I'll see you again tomorrow!

Anya Schrier
Becca Feeken
Belinda Chang Langner
Claire Brennan
Clare Buswell
Edna Morrisedie
Iwona Palamountain
Jean Martin
Jeanne Jachna
Jennifer Cuthbertson
Jennifer Holmes
Julia Aston
Karin Akesdotter
Kelly Schirmer
Laurie Schmidlin
Lynn Mercurio
Renee Lynch
Sandie Dunne
Sarah Martina Parker
Teresa Kline
Tosha Leyendekker


Wednesday, March 6, 2013

Waltzingmouse Stamps March 2013 Release Previews - Day Two

 I don't know about you, but I had so much fun during yesterday's previews. Today is Day Two of the Waltzingmouse Stamps March 2013 Release Previews. And we have a small new set to introduce...Folk Art Labels! Here's what I made with it.


I used the images to make a background patterned paper for my card. You know how I love to do that! :) Then I sewed it to a panel of gingham paper. I stamped the beautiful Folk Art Label in aqua blue and used my Copic markers to color in some of the portions of the label. Finally, I added some leaves on both sides of the label.


Let's get to my second card for today...I decided to keep this one simple in terms of the label. I just stamped it in gray and then colored in the flower in the center.

See that gorgeous patterned background? It's coming up tomorrow! So make sure to come back ok? :)

The other DT ladies have a lot more inspiration in store for you. So make sure to head on over to their blogs and leave them some love! Until tomorrow! See you! :)

Anya Schrier
Becca Feeken
Belinda Chang Langner
Claire Brennan
Clare Buswell
Edna Morrisedie
Iwona Palamountain
Jean Martin
Jeanne Jachna
Jennifer Cuthbertson
Jennifer Holmes
Julia Aston
Karin Akesdotter
Kelly Schirmer
Laurie Schmidlin
Lynn Mercurio
Renee Lynch
Sandie Dunne
Sarah Martina Parker
Teresa Kline
Tosha Leyendekker


Tuesday, March 5, 2013

Waltzingmouse Stamps March 2013 Release Previews - Day One


Hello there! Welcome to the Waltzingmouse Stamps March 2013 Release Previews! This is my first post as an official design team member! Yay! :) I'm so excited to share with you ALL the wonderful goodies that Claire has in store for you this month. 

Today, we're introducing A Good Egg. It's an adorable Easter set that I'm sure you'll all love. It's my favorite set from this release! Even though it's Easter themed, it's versatile enough to be used for other themes as well. 

Let's get to my first card now. I do have to apologize for the photos. Every chance I had to take a picture, the sky was not cooperating with me. lol. It's been gloomy and dark lately hence the not so nice colors on the images.

 I used the larger Chicken Wire image on the background and adhered doilies on each end. Then I die cut a label and stamped the floral images around the edges of the label. I stamped and cut the egg image and stamped a cute sunburst image in the back from My Island. I thought it suited the cute sentiment that came with the A Good Egg set that I used for this card.


I stamped the sentiment on a banner and adhered it over the egg. Before placing the label permanently down onto the card, I tied some baker's twine around the card. Then I added aqua mist doilies above and below the label.

For my second card, I took different images from the set and started stamping. I've been seeing a lot of this clustered theme on Pinterest and thought it would be great with this kind of set. It turned out really great! :) I kept this one really simple because the stamps speak for themselves.

The only extra thing I added was the strips of patterned paper above and below the image that I zigzag stitched.


Ok! That's it for me! Make sure to come back again tomorrow for Day 2 of the Waltzingmouse Stamps March 2013 Release Previews! If you're all done here make sure to head on over to the other DT members' blogs! There's so much inspiration waiting for you! :) Thanks for stopping by today!

Jean Martin - you are here!

Sunday, March 3, 2013

Exciting News!!!


Hey there! Just dropping a short line to share some exciting news with all my blog friends.  I recently joined a great campaign over at Clear & Simple Stamps called Spread the Love. The idea was to create a project for our "blog crush" and share it with everyone. I thought it was a wonderful idea to give a shout out to a blog/blogger that inspired me the most. 

I'm so excited to share that I'll be guest designing for Clear & Simple Stamps for their Collection 7 Release! :) Yay!


I'm so excited and a little nervous as well. Some of my favorite CAS ladies are in the design team and I'm really happy and honored to be playing along with them. I'm just hoping that I can bring it! ;) Watch out for it!!! 


Friday, March 1, 2013

Spread the Love: A Clear & Simple Stamps Campaign


Hi there! I'm joining the Clear and Simple Stamps Campaign - Spread the Love over at Amber's blog, Damask Love. The campaign is about revealing the identity of your "blog crush"! I think it's a brilliant idea. We are inspired by so many blogs out there and in my opinion we need to give them more shout outs. 


So here's my shout out to my favorite blog/blogger....drum roll please...the blog that has me inspired the most and has me coming back again and again for more inspiration and ideas is....Damask Love! YES! It's Amber's blog!!! I love her blog so much that she's in my Chrome's Most Visited list. :)

She recently has a series of Blog Photography posts that have inspired me to try to make my own blog photos better. (hence the props you've been seeing lately. lol. plus a new lens...and a longer wish list for camera accessories.) It was totally worth it though!!!

Anyway, onto the color scheme I chose for my project today...I went with the Earth Tone Mix. I LOVE neutral colors. And I could not use gray any less even if I tried. lol. 


If you've been following Amber's blog you would have noticed, Damask Love had a recent "face lift" a few months ago. Amber wanted to make it more than what it already was. And so a new and better Damask Love was born. And ever since it was revamped, I have been glued to it everyday. (literally - although I was already following it before hand) So, in line with this, I made a "Happy Birthday" card to celebrate the new Damask Love (even if I'm sooo late! lol)


For my card, I used Birch Trees from Clear and Simple Stamps. I only have a few of them in my stash, but this one is my favorite. I used it to make my background panel. Then I stamped two gorgeous damask images from WPlus9 Damask Delight. How fitting for my blog crush right?! :) 

Then I added a strip of chocolate brown cardstock and placed my sentiment and die cut from PTI Everyday Photo Finishers over it.


I
 I have other blog crushes, people from whom I was inspired to try out card making. Blogs that helped me find my niche in our big world of card making. I'm going to try to see if I can make at least another card for a lady who absolutely deserves a shout out. 

But for now, here's my submission to Spread the Love: A Clear & Simple Stamps Campaign. Thanks for stopping by today. I hope you enjoyed my post! :) 

LinkWithin

Related Posts with Thumbnails