Monday, July 29, 2013

WMS Pajama Party


The first ever online pajama party is on! Yay! Welcome to the Waltzingmouse Pajama Party!!! I used to love pajama parties! I remember going to so many of them and having wonderful sleep overs after. Well, this isn't that type of pajama party. But it's going to be loads of fun anyway! Claire has a sketch for us this week. And one of the other challenges was to use feathers in your card. 


So here's what I came up with. I kept it pretty simple and close to the sketch. I used Fine Feathers to make my background. It's pretty simple, I just heat embossed it in white. Then I took some Distress Inks out and used watercolor resist on it.


I also heat embossed my sentiment in gold. I think it ties in well with the purple and blue on the background. I also added some epoxy stickers for a little embellishment.


That's it for me! I hope you'll join the party! Thanks for stopping by today! And see you there! :)


Friday, July 26, 2013

Newton's Nook Designs: Inky Paws Challenge #1


Hey there! There's a new card challenge over at Newton's Nook Designs! Have you checked it out today? If not, head on over to see what their design team has cooked up for everyone! As for me, I wanted to join in of course! :)


Here's a sketch for the first challenge. When I saw it I knew I wanted to see Newton on it! I was also inspired by this image from Pinterest and wanted to combine the two. I could imagine a kitty playing around with the plant.


So for my card, I stamped the sleeping kitties from Newton's Antics and colored them in with Copic markers. Then I adhered them onto a circle die cut. I added the dots because it looked too white to me. lol. And I also think it adds a little bit more interest and shade to the overall image.


I adhered the circle over a gray piece of cardstock. I decorated it with some branches and flowers. The branches are from Memory Box. The little flowers are from Winged Wishes. YES, I did fussy each and every flower you see here. I have no idea how I did that! I must have been in a daze. lol!
 

I hope I was able to combine the sketch and my inspiration picture well. It's almost the weekend! So if you have some inky time on your hands, please join us over at Newton's Nook Designs! :) Thanks for stopping by today! I'll see you again soon! :)


Wednesday, July 24, 2013

Winner Day - Stamping Royalty 2013 Blog Hop!


Hi friends! Today is the day! We're announcing the lucky winner to the Stamping Royalty 2013 Blog Hop! I want to take this time to thank everyone who left such wonderful comments! :) Here we go!


Congratulations Carol!!!! Email me at docjean101@yahoo.com! I just realized my email is missing from my blog! lol! I have to fix that later. :) Please reply within one week! Thanks everybody! 


Monday, July 22, 2013

CSS: Party Blog Hop

Hello there! I'm back for the Clear & Simple Stamps Party Blog Hop! If you just came from Elena's blog then you're right where you're supposed to be! If not, start at Lori's blog. :)
Now...LET'S PARTY!!!


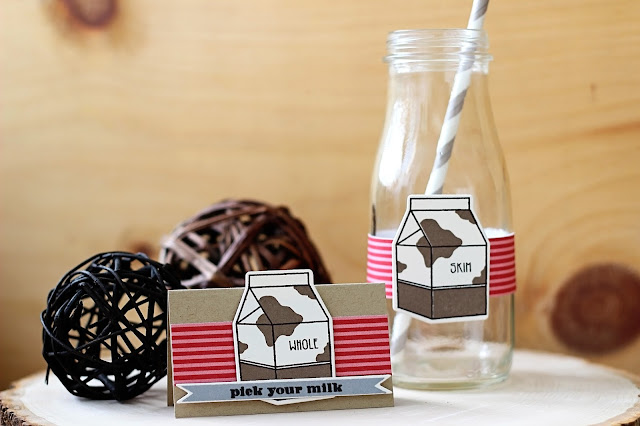
I have a little milk party going on here. Grab a glass of milk, maybe a cookie or slice of cake, and join me! For this set, I used By the Glass Jr., By the Glass Jr. Dies, By the Glass Jr. Sentiments, Party Favor 12, and Favor Flags Dies, and Favor Flags Filler.


I stamped the milk carton image several times to make my background paper for my invitation card. I adhered a strip of patterned paper and added some banners to make it more festive. I topped it off with a little cow "medallion".

Since it is a party, I added a few more pieces to bring this little party to life. Of course we need some milk bottles to serve our milk in. I just wrapped a strip of the same patterned paper on it and adhere the milk carton that I die cut and stamped. I made a little milk carton using my Silhouette Cameo to serve as a favor box. Perhaps some cookies or candies? I also used Party Favors 12 as a tray, you can serve your cookies and candies in them too.

I also made a label for the different kinds of milk you might want to serve. Everything is pretty simple and straight forward. Which is exactly what you need if you're making DIY party decorations. You don't want to be fussy cutting 25 pieces of one image! 

I hope you enjoyed my little party. If you're all done here, you can head on over to the other DT ladies blogs' for more inspiration. Thanks for stopping by today! :)

Friday, July 19, 2013

Stamping Royalty 2013 Blog Hop


Hi there! Welcome to the Stamping Royalty 2013 Blog Hop!!! If you just came from Jennifer's blog then you're right where you're supposed to be. If not, please start from the top with Natasha's blog! Don't forget to leave comments along the way! Prizes are being offered up on EACH blog!!! :) 


Here's what I'm giving away! It's a portion of my prize that I wanted to share with my crafty online friends. So make sure to leave a comment. You can do so until 11:59pm EST on July 23. The winners will be announced on Wednesday, July 24.


My category for this hop is Christmas/Season's Greetings. I wanted to pay tribute to the stamp company that helped me win my first ever Stamping Royalty contest! It's none other than Papertrey Ink! For my card today, I used Tag-its #9, Mehndi Medallion Mini, Santa Stationery, and Christmas Labels.

 I used Tag-its #9 to create my background. Stamping them in with PTI's Spring Moss and Aqua Mist. As well as Hero Arts Soft Granite. Two of the wreaths were made by using heat n' stick embossing powder and then coating it with fine glitter. 

 I also wanted to add glitter to the label. So I used glue and lined the inner portion of the label and spread some glitter on it. I put it over a bed of burlap and some baker's twine.


There you go! If you're all done here, you can head on over to Alicia's blog now. :) Thanks for stopping by today! I'll see you again soon! :)

Thursday, July 18, 2013

Newton's Nook Designs Launch Party - Day 4


Hello! AGAIN! lol! It's my 3rd post for today, so make sure to check out the first 2 just below! :) Welcome back!!! You made it to the last day of Newton's Nook Designs Launch Party. Today, we're featuring Campfire Tails

For my first card I made a little campfire scene, complete with a tent! I stamped in the images from the set and colored them in with Copic markers. For the tent, I just cut out a triangle and made flaps for the entrance. I also colored it in with Copic markers. As you can see it's a very rough coloring which I did on purpose.


The background was made by using a blending tool with some dye ink. Then I stamped some stars with a white pigment ink. It's very bright and clear in person, not sure why it didn't come out well in the pictures. :(


For my second card, I made another campfire scene. I made it using my favorite image from the set. The cute little raccoon! Doesn't he look like a little bandit eating chips?! So adorable! :) I stamped in the images, colored them with Copic markers and fussy cut them.


 I added the die cut tree to complete my scene. And I stamped my sentiment on a strip of vellum paper.


Whew! It's a full day of posts! I hope you had fun! Did you enjoy the reveals? Everything will be available this Friday, July 19th. For more inspiration please head on over to the other participants' blogs. Don't forget to leave a message as you go for a chance to win this set! Thanks for stopping by today! I'll see you all again soon!

Chari Moss - GD

ps. Don't forget to come back tomorrow. The Stamping Royalty 2013 winners are having a blog hop with a LOT of prizes in store!!! See you there!

Clear & Simple Stamps - Basics Feature

***My CASE Study Challenge Post is just below. Please scroll down and take a look!***


Hello again! If you didn't catch my previous CSS posts from before, I was lucky to be chosen to guest design over at Clear & Simple Stamps! Today I'm featuring Fanfold and Labels 13.


I made a two projects for today. Let's get to the first one. I made a card and a coordinating gift tag for a baby.

I used Fanfold to make my background patterned paper. I heat embossed white embossing powder over some pink cardstock.


I used Labels 13 to make a little tag. And I layered it with a Banner 1 die up top. Afterwards I decorated it with another banner from the same set and stamped in it's coordinating image from Favor Flag Fillers. Finally, I stamped the sentiment from Baby Shower and adhere it on top of everything else. Of course I couldn't just leave it like that...I die cut this cute elephant from Baby Shower dies and added it below the tag.

 I made another tag using the same process and used it as a gift tag.

I made another baby card and tag set using the same stamp sets and dies. A little re-arranging can give you a totally different look! How do you like this one? :)


  Whew! That's it for now. There's a CSS Party Hop coming up next week, make sure you come back for that! And don't forget to stop by the other DT members who are featuring some stamp sets and dies today! 


Thanks for stopping by! I'll see you again soon!


Wednesday, July 17, 2013

Newton's Nook Designs Launch Party - Day 3


Welcome to Day 3 of Newton's Nook Designs Launch Party! It's been a fun 2 days filled with inspiration. I hope you're ready for more! Today, we're featuring Winged Wishes. This is my favorite set and I'm so excited to share it with you all! :)


For my first card, I die cut some clouds to hang my banner on. I stamped my banner straight onto the kraft cardstock as well as on some patterned paper. Then I fussy cut each one and adhered onto the base cardstock.


I also added a strip of cream cardstock that I colored with my Inktense pencils to make a sky background. I then stamped the baby clothes hanging as well as the birds carrying them. I did it again on a separate piece of cardstock, colored it in with Inktense pencils, fussy cut them and adhered them. I'm happy to say that I enjoy using the pencils! Of course there's no replacing Copic markers, but this is just a cheaper alternative where you can get a few more colors. You just color in your image lightly, then use a water brush to spread out the color. 

Lastly, I sewed the cardstock piece onto my base. I also stamped the sentiment and tied some baker's twine around it.


For my second card, I guess you can tell what my favorite image is in the set. I used the baby clothes line again. This time, I made it look like they were hanging in the clouds. :)


Again, I added a few clouds. Some of the baby clothes were colored in with Inktense pencils, while the others were paper pieced.


There you go! Would you like to win this adorable set? All you have to do is to leave comments on each of the participants' blogs! Easy right?! For more details on the prizes, head on over to Newton's Nook Designs! I'll be back again tomorrow for one more round of reveals! Thanks for stopping by today! See you again! :)

Chari Moss - GD


LinkWithin

Related Posts with Thumbnails