Tuesday, April 23, 2013

Stamping Royalty 2013

Hey friends! I just wanted to share something fabulous with you all!!! I made it in the Papercrafts Stamping Royalty 2013 contest!!! I'm absolutely giddy about it!!! Lol!


I'm still on vacation for 2 more weeks. I haven't had the chance to post my pictures yet. Hopefully I'll be able to this weekend. I miss you all and apologize for not being able to comment these past few weeks. I'll make it up to you when I get back! See you all soon!

Thursday, April 18, 2013

Waltzingmouse Stamps April 2013 Release Blog Waltz


***This is my second post for today. For CASE Study Challenge 137, please scroll down.***

Hi there! Welcome to the Waltzingmouse Stamps April 2013 Release Blog Waltz! Yay! You've reached the final day of our April release! What do you think so far? Aren't the sets amazing?! I'm pleasantly surprised that for someone who has such a hard time with masculine cards and tends to shy away from it, I've found myself enjoying this release so much! I hope you're enjoying it as much as I am!

You should start the Waltz from the WMS Blog, Claire has the entire list of Blog Waltz participants. If you've found your way here from Jen's blog then you are right where you're supposed to be. If not, make sure you start from the beginning. As with all of our WMS Blog Waltzes, one lucky participant will have a chance to win a prize!!! Let's get started here.

First up is this super CAS card I made. Can you believe it?! ME?! Doing CAS?! :) I hope I'm doing this justice...seriously!!! Anyway, I just stamped a sentiment from Man of the Hour on a white card base. Then I stamped a border stamp from My Kind of Guy to flank each side of the sentiment. That's it! :)


Next up is another masculine card. This one I made using ALL of the 3 stamp sets we're releasing this month. I stamped the rectangular and circular frame from My Kind of Guy straight onto the kraft card base. Then I decorated it with the little circle embellishment from Nordic Baby.


I die cut a banner and used a white marker to outline and color it. Don't you just love it?! I was so happy with how it turned out! The sentiment is from Man of the Hour, which I heat embossed in white.


And finally, my last card for today, and YES, it's also a masculine card!!! I'm crossing my fingers here that you've found a lot of inspiration for your own masculine cards. This one is another CAS card. I just heat embossed the sentiment from Man of the Hour onto the charcoal cardstock strip and adhered it onto the kraft card base. Then I stamped the mustache image from My Kind of Guy above it.


I wonder what the CAS card goddesses think of my cards...lol! I am absolutely floored as to how they make CAS cards look so finished and awesome! I really, really hope that I'm doing this style justice! Let me know! :)


Remember, you must leave a comment on all the participants of the Blog Waltz for a chance at the prize. You have until April 21st at 11:59 PM (GMT), 5:5 9AM Central (March 12), 3:59 AM Pacific and 6:59 AM Eastern to leave comments. The winner will be announced on Tuesday, April 23rd. Now if you're all done here, please head on over to Karin's blog to continue with the Waltz! Thanks for stopping by today! I'll see you again soon! :)


Wednesday, April 17, 2013

Waltzingmouse Stamps Presents: Man of the Hour


As promised, I'm back for Day 3 of the Waltzingmouse Stamps April Release Previews. Today, we're going back to the masculine themed projects.  I'm so excited to show these to you! I made a gift set for Dad. There's a card as well as packaging for a little gift. This features the stamp set Man of the Hour.


This is my favorite card for the entire release. I used different sentiments and combined them in one card to make the entire card. I also used the border stamp from My Kind of Guy to separate the sentiments.


For the gift, I just wrapped it with kraft wrapping paper. Then I tied some twine around it and added the little sentiment over it. I heat embossed the sentiment in white on a piece of charcoal cardstock.
 

 That's it for Day 3! I know that there are a lot of us who have a hard time with masculine cards. I hope this helps a bit and gives you more ideas for your masculine cards. Make sure to head on over to the other DT girls for more inspiration.

Anya Schrier
Becca Feeken
Belinda Chang Langner
Claire Brennan
Clare Buswell
Edna Morrisedie
Iwona Palamountain
Jean Martin
Jeanne Jachna
Jennifer Cuthbertson
Jennifer Holmes
Julia Aston
Karin Akesdotter
Kelly Schirmer
Laurie Schmidlin
Lynn Mercurio
Renee Lynch
Sandie Dunne
Sarah Martina Parker
Teresa Kline
Tosha Leyendekker


Tuesday, April 16, 2013

Waltzingmouse Stamps Presents: Nordic Baby


Did you enjoy yesterday's previews? It's Day 2 of the Waltzingmouse Stamps April Release Previews. We're going off the masculine themed set today and featuring Nordic Baby. It's a small baby set that you will absolutely adore.


The background stamping I did on this card is actually made from yesterday's preview stamp set, My Kind of Guy. As you can see, even if it is a masculine themed stamp set it's versatile enough to be used for other themes.

 I stamped the baby booties and hand cut it. I also hand cut the little circle embellishment and added it on top of the booties. I stamped the sentiment on a piece of vintage cream cardstock. I also added a strip of lace, tied some baker's twine over it before I adhered the booties.


For my second card. I made a Welcome Baby card as well as a banner. I was inspired by this photo from Pinterest and wanted to recreate the beautiful pattern on the banner.


Here's what I came up with. As I was making this post, I just realized that I should have used a gray background for my photo as well!!!! Argh! But since I'm on my vacation I can't really do anything about it. So here it is...


What do you think? Isn't the resemblance striking? I love it! :)
I used the patterned circle image from Nordic Baby and added the star from Join Us. I used the same pattern to make the banner as well as the background image of my card.
  
I dry embossed a strip of kraft cardstock and then heat embossed the sentiment on the bottom. I stamped the booties and hand cut them similarly to my first card. For this one though, I punched a circle through the top so that I could add the baker's twine.


There you go! That's all I have for today. I'll be back again tomorrow for more cards. In the meantime, why don't you head on over to the other DT girls for more inspiration.

Anya Schrier
Becca Feeken
Belinda Chang Langner
Claire Brennan
Clare Buswell
Edna Morrisedie
Iwona Palamountain
Jean Martin
Jeanne Jachna
Jennifer Cuthbertson
Jennifer Holmes
Julia Aston
Karin Akesdotter
Kelly Schirmer
Laurie Schmidlin
Lynn Mercurio
Renee Lynch
Sandie Dunne
Sarah Martina Parker
Teresa Kline
Tosha Leyendekker


Monday, April 15, 2013

Waltzingmouse Stamps Presents: My Kind of Guy


Hello there! And welcome to the Waltzingmouse Stamps April Release festivities! This is Day 1 of the WMS Previews. I'm still on vacation, but I've prepared these lovelies for you in advance! We're starting things off with My Kind of Guy. It's a masculine stamp set that I'm sure we all need in our stash. 

You know those people who have a hard time with making masculine cards? Well, I'm afraid to say that I'm one of them! lol. I have to admit, I'm was a bit nervous to share my cards. heehee! But here we go anyway!


Before I started making my cards, I went to Pinterest for inspiration. I did a little researching on masculine cards. And I found that I liked the CAS masculine cards the best. I also found that the masculine themed images use mostly dark and neutral colors, as well as utilizing a modern approach.

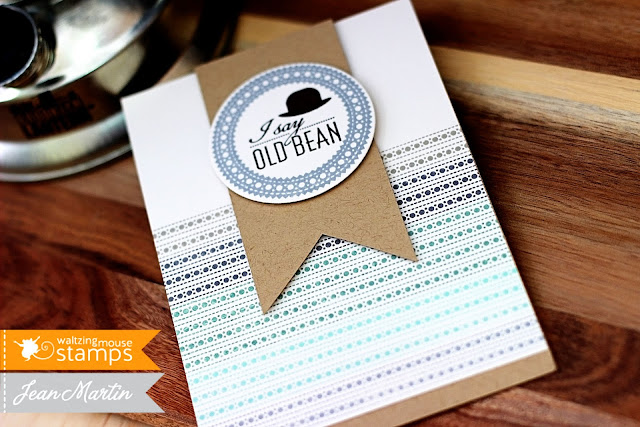
With my first card, I used a border image stamp to make my background. I stamped it in Soft Pool, Ocean Tides, Soft Granite and Charcoal. Then I cut out a banner from kraft cardstock and adhered it with foam tape. Then I stamped the circle frame and sentiment and die cut it.


For my second card, I went a bit more CAS. I just stamped the sentiment and heat embossed it on a strip of charcoal cardstock. 


I totally forgot to take a picture of the card side ways. The card base is actually made from charcoal cardstock. I just adhered the kraft panel on top in order for the charcoal panel to stand out. It's actually a great effect and added a bit more umph to the card. :)

There you go. What do you think of my masculine cards? I hope I haven't made a blunder with them. heehee. I'm so glad the other DT have samples too! If you did not find any inspiration here...you will find them there for sure! :) 

Anya Schrier
Becca Feeken
Belinda Chang Langner
Claire Brennan
Clare Buswell
Edna Morrisedie
Iwona Palamountain
Jean Martin
Jeanne Jachna
Jennifer Cuthbertson
Jennifer Holmes
Julia Aston
Karin Akesdotter
Kelly Schirmer
Laurie Schmidlin
Lynn Mercurio
Renee Lynch
Sandie Dunne
Sarah Martina Parker
Teresa Kline
Tosha Leyendekker


Thank you for stopping by today! Please come back for more tomorrow!

Saturday, April 13, 2013

WPlus9 Le Cirque


I'm back with another post for WPlus9 Design Studio. I really hope you enjoyed the last one. This one has been something that I've been wanting to do for quite a long time now. I have no idea why I never did so before! Lately, I've been enjoying looking for inspiration on Pinterest. And I have been coming across these awesome party sets for baby showers, birthdays, bridal shower, etc. Le Cirque fit the party theme so much that I was so excited to make this set. It's my first big set so please be kind. lol.

For the invitations, I had to print the wordings out. After I cut them to size and punched the corners, I started stamping to add the design. I used Hearfelt Mix and Pile It On to make the banner. And then of course Le Cirque for the rest. I added a little ticket on the upper left hand corner with a wooden clip. It comes out easily and can be slipped into the envelope I made using my Silhouette Cameo.


Here's a look at the rest of the set. I made tags for party favors, straw flags, bottle labels, place cards, cupcake toppers, and a party sign. For the party favor tags, I used a masking technique to get the tent, ballerina, ring master, and elephant together that way. I also used the same technique on the invitations.

 The popcorn box was made with my Silhouette Cameo. I just added the cute little popcorn tag to it. Same thing with the cupcake wrap, I wasn't willing to hand cut cupcake wrappers for a party, considering I would probably need 25-50 pieces of it. But the cupcake topper and popcorn tag were pretty easy to make. You can use your Silhouette as well, but I prefer using dies. The edges always come out better that way. 


I used the Banner Trio Dies to make the straw flags. I just die cut the banners, stamped Celebrate on it then adhered it with Scor Tape. Do not use anything else but Scor Tape because other adhesives will just peel off.


 For the place card, I used the frame from Bitty Buddy Valentines. The party sign in the frame is actually something I made in Adobe Illustrator. I made a blank one that you can download here. You can use it on Adobe Photoshop, Illustrator, and Elements. Just type in your own wording in the font that you want.

There you go! A DIY party set! This was such a fun project to make. I hope you will give it a try with your next party. Jill from Greenwood Girl Cards suggested that I make a birthday set: cards, tags, and packaging for my next WPlus9 Design Studio post. This is a start Jill! I'll make birthday packaging my next project when I get back from vacation.  Thanks for stopping by today! 


FREE DOWNLOAD: Party Sign


LinkWithin

Related Posts with Thumbnails