Monday, August 26, 2013

The Shabby Tea Room - Week 181


Hello! Looks like things are back to being a little quiet around here. It's probably a good thing, because I've been spending nights sitting at my craft table having a hard time coming up with anything! What do you do when you're having a dry spell? Stamp releases usually do it for me. But since we've just finished the releases, I hope I can find something to kick start my crafty mojo.


Let's see if this one will give it a go. It's week 181 over at The Shabby Tea Room. It's also my last week as their month long guest designer for August. Hopefully, you've enjoyed my card submissions and have had the time to join us. 

For this week's challenge, you have to use the colors found in our inspiration photo. As well as have a "tea" themed project.


For my card, I took the floral theme of our little tea picnic and made a background with it on my card. I used WPlus9 Embroidered Bouquet. I stamped the stems in green and stamped the flowers in colors I took from the inspiration photo. 


I stamped and hand cut a few of the flowers so that I could adhere them with foam tape to give a bit of dimension to my card.


As for my tea theme, I used Tea for Two from PTI. It's not visible in my photos, but I used so Wink of Stella on the tea pot as well as the centers of the flowers. They added a bit of bling to my project.


I've enjoyed being a part of The Shabby Tea Room even for a short while. I hope you liked my submissions too! If you have some inky time this week, please join us! Thank you so much for stopping by today! I'll see you again soon! :)


Wednesday, August 21, 2013

WPlus9 August/September Release - Day 3


Hi there! I'm back for Day 3 of the WPlus9 August/September Release. It's my last day today, but I hope you've enjoyed everything and have found some inspiration. I'm featuring Dockside ,Dockside Backgrounds, Dockside Die and Nautical Notions Die today, so please join me!

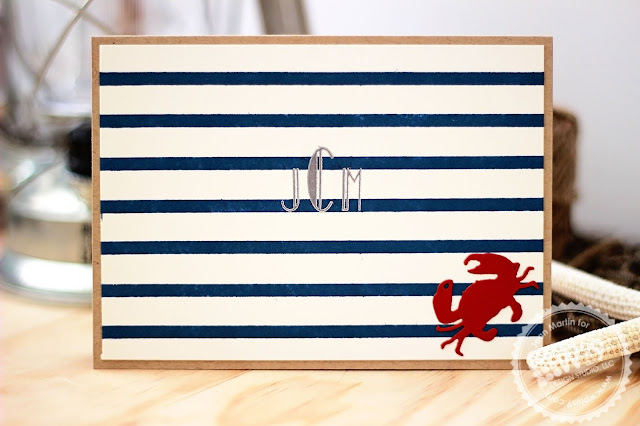
I just love cards with navy blue stripes on it. LOVE the bold look it gives the cards. If you can believe it, I'm actually featuring a lot of CAS cards today. lol. I would never have thought that because of how hard the CAS style is for me. Heehee. But Nautical goes so well with it that I gave it a go. :)


I used the Nautical Navy cardstock to make the bold stripes on the background. Then stamped the circle image and die cut it with Clear Cut Stackers: Circle. I attached the crab from Nautical Notions Die with foam tape and heat embossed my sentiment below it.


My second card is similar to the first, but this one I made using Borders & Backgrounds 2. Then I heat embossed Monogrammed in silver and added the same a smaller crab die from Dockside Dies.


This is one of my favorites. I saw a cute anchor necklace and thought I would translate it into a card. I used the anchor die from Nautical Notions Die. I made a shadow behind it by die cutting two in different shades of gray and then adhering them off center.


For this card, I used Dockside Backgrounds to make the wooden slats. I used the sentiment from Dockside as well as the beautiful compass. 


I finished it off by tying some jute twine around the card and attaching an anchor below the ribbon.


Finally, one last CAS card for today. I saw something similar on Pinterest and thought it was really pretty. So I tried to make my version of it. I hope it's ok. My CAS cards are always hit and miss. When my sister saw this (we were Skyping while I was making cards) she said that it looked like something was missing from it. lol! What do you think? Please back me up here. Hahahaha. :)


There you go! I hope you enjoyed that a lot! Thank you so much for joining me these past three days. I had so much fun with these new sets that I'm pretty sure you'll see me using them often here. See you again soon!

Tuesday, August 20, 2013

WPlus9 August/September Release - Day 2


Hi there! I'm back with the second installment of the WPlus9 August/September Release!  I hope you enjoyed yesterday's projects. I've been having so much fun with them! Today, I'm featuring Monogrammed, Basic Banners + Die, Borders & Backgrounds 2, and the A2 Envelope Liner.

It's going to be a photo heavy post again, I hope you don't mind. Here we go! My first card was inspired by a card I saw on my visit to Paper Source. I loved it so much that it stuck in my head for weeks after I saw it. When I finally go my new stamp sets I knew I could my own version of the card that I saw. Here it is...


It looks pretty simple. But the execution was a little harder. I don't usually make one layer cards with a LOT of masking so this took quite a while for me. Although, Jennifer McGuire had made something like this a few days ago. It looked so easy when she did it. lol! So it could be just me! haha! I used Fresh Cut Florals as well as Monogrammed to make this card.


I was so happy after I made this that I had to try to make another one. This second card also used Fresh Cut Florals. But this time, I paired it with a sentiment from Fanciful Feathers and Basic Banners.


 I used the same color combination on this card.


For my third card, I used Borders & Backgrounds 2. I saw an image of a necklace with feathers on it and wanted to dangle my feathers on twine as well. :)
I die cut the feathers from Fanciful Feathers and heat embossed them gold. For the sentiment and banner I used Basic Banners.


For my last card, I used the same stamp sets except changed the colors and patterns up a bit. I saw this cut color combination on Pinterest and decided to try it out on my card.


What do you think? Don't you just love those feathers?! I love background stamps. I just noticed recently that I rarely use patterned papers anymore. It's just so much more fun to make my own! That's it for me today! Come back tomorrow! I have a lot more to share with you! Thanks for stopping by today! :)

Monday, August 19, 2013

WPlus9 August/September Release - Day 1

***This is my second post for today. If you're looking for TSTR 180, please scroll down.***


Hello again! Yes it's me again. I told you we were going to be a bit busy this week. Have you seen the WPlus9 August/September Release yet?! Aren't they amazing?! I had so much fun with them that I kept on making one card, after another, after another. So it's going to be a photo heavy post. I won't go into so much detail since there are so many of them. But if you have any questions, just pop me an email and I'll gladly reply. :)

Let's start! Today, I'm featuring Fanciful Feathers, Fanciful Feather Dies, and A2 Envelope Liner Die. I actually asked Dawn if she could design an awesome feathers set a few months ago. I was absolutely delighted when I saw these!!! I was so excited to ink them up, hence the large amount of images on this post. I hope you like them all!!! Let's start with my little feather card set. I made three coordinating cards as well as envelopes lined with coordinating liners.


 When I saw Dawn's project here, I knew I wanted to make my own version of it. So I picked out one of my favorite color combinations and made this!


And this...

 Yup! This too!

 I also made a coordinating gift package.


The fold on the feather is actually a Wink of Stella marker. I love these! I need to get used to them, but so far, I am having a lot of fun with them.

 Since I couldn't help myself. I made some more! Can you see the feather in my card?! My husband can't!!! :( I die cut the feather, heat embossed it gold and cut it into three pieces. I attached each piece onto a piece of cardstock that I stamped. I didn't have a solid square stamp, so I had to improvise. I actually used Country Charm and just flipped one of the patterned square stamp so that I could get a solid square image. 


Yup! I made a CAS card! Here's another one. It's the last one I promise. lol. 


I hope you enjoyed all my cards today! Please come back tomorrow! I have more cards prepared for you. Thanks for stopping by today! :)

The Shabby Tea Room - Week 180


Hi there! It's going to be a bit busy around here again. I have a release feature and some challenges for this week. So let's start with a challenge! It's Monday again, and time for another The Shabby Tea Room Challenge


If you've only joined me today, I've been guest designing for TSTR this month of August. Here's our inspiration photo for this week. The challenge is to use the colors in the inspiration photo as well as to use fabric flowers in your project.


Here's my interpretation of the inspiration photo. If you look closely at the photo it looks like the dress actually has small pinstripes on it. So I made a pinstripe background for my card as well using my pinstripe background stamp from WMS. And instead of having lace, I heat embossed a clock face from Hands of Time on my background paper. 


I wanted a vine that looks like it was crawling on top of the clock face so I took my Harvest Berries, die cut it, stamped it and adhered it with foam tape over the background panel. The vine was a perfect place to position my silk flowers.

And I absolutely love this cute little fox from Hello Foxy. It was a perfect addition to my little card. The sentiments from Bigger Blooms are some of my favorites, so of course I had to add it here. 


There you go! My card for The Shabby Tea Room - Week 180. I hope you enjoyed it. Please join us for a little inky fun over at The Shabby Tea Room! See you there! :)

Monday, August 12, 2013

The Shabby Tea Room - Week 179: Vegetable Garden


Hello there! I'm back for The Shabby Tea Room Week 179. If you've only just checked in now, I'm the lucky month long guest designer over at The Shabby Tea Room! I hope you join us this week! 


This week's theme is Vegetable Garden. I was really lucky because I had just added the Vegetable Garden stamp set from PTI a week or two before I received the inspiration photos. This was a bit of a challenge for me though. But then, this is a card challenge after all! So grab your vegetable stamps and take the challenge! :)


I grabbed my Vegetable Garden stamp set and started by creating a background patterned paper. I didn't stop there though. I wanted to make the images glossy. So after stamping the images, I heat set them and then heat embossed them with clear embossing powder. 


The only thing I didn't like about embossing the images were that they darkened after the embossing. So if you're going to try this, make sure to use lighter shades of ink if you don't want your images too dark.

There you go! Are you ready to take this challenge?  Please join us over at The Shabby Tea Room! Don't forget to head on over to the other DT ladies' blogs for more inspiration! Thank's for stopping by today! I'll see you again soon! :)


LinkWithin

Related Posts with Thumbnails